
Matt's Awesome Stuff
Easiest MOT Salvage Tutorials
Last Updated: 13APR2012
These are the first video tutorials (and first videos) I made. They teach you, step-by-step, how to find and tear down microwaves the easiest way possible for their transformers, and how to do all the math to know how to rewind them, and put them back together for whatever projects you have in mind.
Start here for the generic salvage tutorials before moving on to any future projects. All MOT videos are arranged in a Youtube Playlist. That's the easiest way to view them, click here: Awesome MOT Project Tutorials
Sometimes I'm hard to understand and parts of the video flash by fast, so I'll include the scripts to all the Salvage videos below and the cheat sheet. (Also translating text here is easier than audio translating). Generally though, there's no reason to read any of this text if you watched the video, it's just the same text as the movie.
MOT Salvage Part 1
MOT Salvage Part 2
MOT Salvage Part 3
MOT Salvage Part 1 - Script
Intro
Welcome to my tutorial series on MOT salvaging, where I'm going to show you how to turn a broken microwave into some cool projects using very few tools and using the best and easiest methods that I've either gleaned from the community or discovered myself over the years.
Most of you are watching this because you came here looking for it, but for those of you wondering what use anyone would have for this, any time you have a project where you need a big transformer they're expensive. $50, $100 or more. So they're a significant portion of a project's cost. In fact some projects, almost the entire project is just a transformer. Projects like a spot welder, a stick welder, arc furnace, plasma cutter, battery charger, etc. So they're great cheap transformers. On top of being transformers you can also use the cores as the base for inductors, ballasts, chokes and other typically expensive big components.
So speaking of cheap, never pay for a microwave to salvage. A broken one is fine and you can find them everywhere. Keep an eye out on garbage day, at the dump, at recycling centers or put an ad on Freecycle asking for broken microwaves. If you live anywhere other than a small town you'll get replies right away. Appliance repair shops might set some aside for you if you ask nicely or, as a last resort you could buy a microwave (second hand).
This video is part one in a series and it deals with the teardown of the transformer. In following tutorials I'll show you the process for reassembling as well as cover some specific and easy standalone projects.
So in this video we disassemble the microwave itself to get at the transformer. Separate the transformer's core into two blocks. Remove the coils and the shunts from the core. And clean it up so it's ready for the next phase. Let's get right to it.
1. Disassembly.
The first thing you're going to need is a microwave. Any microwave will do as long as it doesn't say that it's an "inverter" microwave. Flip it on its back and then go ahead and take apart any screws that hold the outer metal frame to the inner frame. And when you're done flip it on its front face so you can get at the screws underneath. Then also take out those screws.
Now to get inside of it you just have to yank on the outer metal shell. Wiggle it free. Sometimes it doesn't want to come, just give it a yank until it comes off and then you can toss that aside.
And here's a look inside. There's the transformer that's what we're after. You can also see the capacitor, the magnetron, a bunch of other stuff.
It should be discharged already after a few minutes, most of them will be but you'll want to take a screwdriver and short the terminals on the capacitor or you could get a 2000V shock. Make sure you short it a lot.
Now that everything's safe to touch you can disconnect the transformer. There'll be 4 or 5 wires you can usually use a pair of pliers to disconnect them, or if you don't feel like doing that just leave a couple inches and cut the wires.
And once you're all done just flip it over. Usually it'll be attached with 4 bolts at the bottom. Sometimes they're Phillips screws, sometimes it's a mounting bracket. Just figure it out. If you don't own a ratchet you could use pliers, just make sure you squeeze tight. But it's much easier to use a ratchet, and even easier than a ratchet is a drill.
For the last one it's important to remember that there'll be nothing to hold it so you'll need to hold it with your hand and it's quite heavy. And there you go, now the transformer's out. You can take the rest of it and toss it aside for now. You might want to pull a few more things out of it, the powercord the fan, a few switches but for right now that's all we need.
And just to review what's inside a transformer, we have a secondary made of very thin wire, we have a primary made of thick wire, we have a few turns of some other wire, and we have some magnetic shunts at the top and bottom.
Now the way everyone else does this which I think is the much tougher way is, they take a chisel and they hammer off the secondary and they get something like that, and then once that's torn off they have a flat side. And then you take a punch and you punch those out until they're gone and then you have an empty transformer. And then you thread your new secondary through it all the way and forth every single time. I don't like that way.
2. Core Separation.
Now, a transformer is made up of "E" pieces and "I" pieces, and in a microwave oven transformer they're stacked together rather than alternating. There's a big "E" piece, there's a big "I" piece. And they're actually only held together by a thin weld that goes along each edge. They're not welded all the way through, in fact a transformer wouldn't work that way.
Now if you cut that weld they'll just separate like on my other transformer there. You can use a hacksaw it actually cuts really quick it feels like cutting wood, transformer iron is very soft it's not like steel. You could use a Dremel as well but there's actually a faster way, just use an angle grinder. The only tricky part is to make sure you cut in a straight line directly over the E-to-I seam. You don't want to go too deep, but you do want to make a little bit deeper of a cut on the corners where the weld is a bit thicker.
Then put it on the ground, get a tire iron, put it in the crack and give it a twist until you hear it separate. There you can see the gap. If you don't have a tire iron you can use a screwdriver or you might have to use a block of wood and hammer on it at an angle. But once you get the crack just pry it open a little bit until it's all the way open. Then put it on a table and you can finish it by hand. Here you can see just how thin those welds are, they're 1/16" thick at most. And now your transformer frame is apart.
3. Coil Removal.
Now we have to take off the primary and the secondary. And you can do this cold with a knife and try to sneak it between all the edges. But it's easiest if you do it hot. And you can either heat it up in an oven or toaster oven for about a half hour on a low setting, or you could use the heat loss of the actual transformer itself as a heater.
[WARNING - This method leaves INSTANTLY LETHAL 2000V sitting in the open. Use extreme caution and if you're not comfortable with high voltages, just use an oven or try it cold. I originally included this method for electronics geeks who knew what they were doing around high voltage. 99% chance that's not you, so just use an oven or electric stove. ONE SLIP UP while the 2000V is powered and you'll be dead before you feel it.]
To do that put the transformer back together (removing shunts first speeds the process up 2-4x), and then hold it together using some rubber bands, clamps, zip ties, whatever you have available. I hold mine together with some bricks as well to be sure it doesn't slide around. Then go ahead and get your power cord and making sure that it's not plugged into anything, connect your power cord to the primary coil, that's the heavier coil, you might have had to strip the ends a little bit. And then make sure none of the other cords are touching any of the metal or each other, and that you're not touching it. Plug your power cord in, nothing should happen yet. Brace yourself for a loud noise, then hit the power switch.
[Intermission - Take a (supervised) break for 30 minutes (5-15 if the shunts are out) while it heats up. Don't let people or pets touch]
Shut off the power bar first and unplug it second. Go ahead and take apart your transformer again. Make sure you do it in that order or you could get electrocuted.
Notice that I'm wearing gloves, that's because the transformer is now hot and the varnish should be soft. This one seems a little bit stubborn so, there's a few tricks you can try here. You can use a chisel not for its edge but for a wedge shape, just hammer it through. Don't scuff the primary. You can also use something as a little bit of a pry bar.
Now that the varnish is soft you can use and X-Acto knife and it should run a lot easier, if you tried it before when it was cold, this is a lot easier now. Sliding it down the outside, you don't need to go very deep. Be careful when you slide it down the inside as when you overshoot it's going to gouge the coil.
A little bit of lifting, a little bit of prying, and there we go it's out.
If this seems intimidating or difficult at first, don't worry, it's just because it's the first time you've done it. After you've done one it becomes a whole lot easiest.
Next you'll want to get rid of this middle coil. It's not that hard to figure out. Just cut it or rip it out or you can unthread it. Rip rip rip, rip rip rip and it's gone.
Next you need to get rid of these magnetic shunts. They're just like a stack of laminations that are held in there. They pop out and they look like this. Y'know, like that, stuff like that. And the easiest way to do that is to just support it between two bricks or two 2x4s, get something you can use as a punch and while the varnish is still hot, it'll just slide right out. Sometimes they're stubborn and won't come out, so in those cases just grab a flat screwdriver and try to chip away 2 or 3 of the layers just a little bit until they're bent and separated. Grab a pair of pliers and twist and rip. Just pull off a few layers and a time and that's it. Now, I'm going to finish tapping this one out with a punch. There are some situations in which you want to keep the shunts in, not a lot, and in most cases you can them gone because they limit the current.
Now if your primary was at the very back of the "E" you wouldn't do anything right now you would just leave it as is most times. But in this case it's the secondary that's at the back and in most cases that's going to be useless to us so it needs to come out as well. So if your transformer is still hot and the varnish is soft you can hammering it out with a punch or you could put it in a vice and squeeze it out with a vice. This one's a bit stubborn so I'm going to have to cut around the edges of the cardboard to help the varnish release. Especially if you plan on saving the wire from the secondary you never want to hammer directly on it you always want to use a wooden punch. There it's starting to go, you might end needing more than one punch. Finish it off by elevating it again. And out it goes.
4. Cleanup.
Lastly you'll want to do a little bit of cleanup. Pull all the old cardstock off you'll have to replace that later anyway. And there you go, and empty metal "E" and it's hat.
You might want to clean up on the inside with a chisel or file to scrape that old varnish off but otherwise the primary should fit right back on and you're good to go.
MOT Salvage Part 2 - Script
Intro
Welcome to Part 2 of my tutorial series on MOT salvaging, where I show you how easy it is to turn a broken microwave into some cool projects. If you've just stumbled across this video, go watch part one first, it explains how to get a microwave oven transformer and tear it down the easiest way.
This video got a bit long, so I split it. In this video, we start with a transformer core, and go through the general procedure for re-designing it into whatever new transformer your project requires. So, that includes core selection, turns count, and wire sizing.
Warning, boring science content.
You need some science. No one can give you fixed plans and measurements, or anticipate every question you might have for every project. So even though this tutorial isn't for a specific project, you have to learn to be your own engineer and know a little bit about electricity to solve your own problems. Don't worry, it's just basic arithmetic.
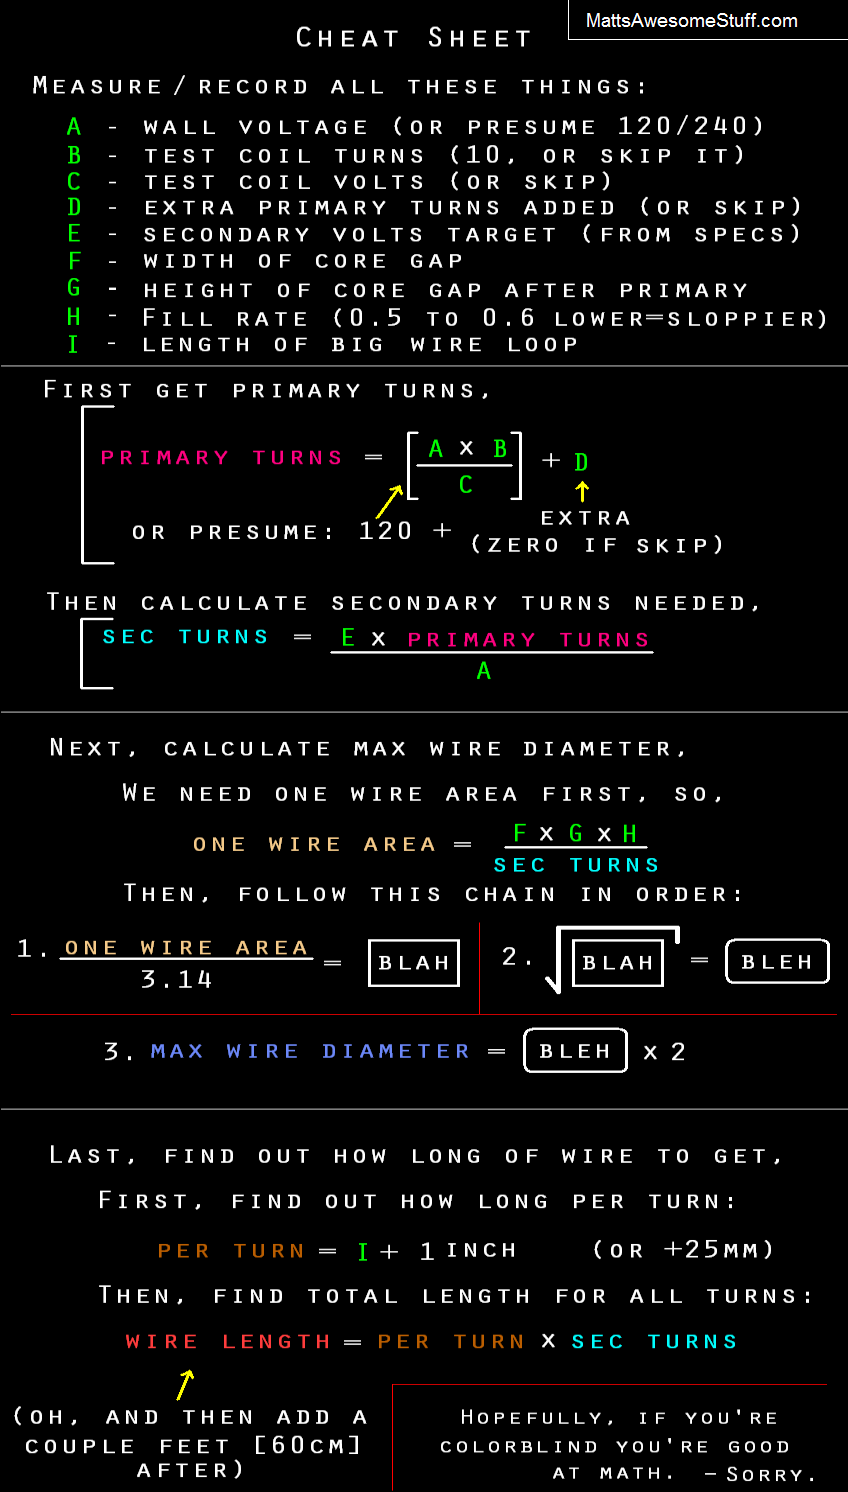
If math and science scare you, just listen to the concepts because if you understand those, it becomes common sense. In fact, if you know the concepts, you can usually skip the math, cut corners or just guess. Regardless, I made a cheat sheet at the end with a procedure for you to follow, so that you just take any specs and your new measurements and drop them into place.
Here we go.
1. Core Selection
Transformers come in a huge range of sizes and configurations. The type that comes out of a microwave is just one of those types. But any of the projects I teach you to make with MOTs, were selected to be suitable for that size and type. However, even among microwaves, the transformer sizes vary from about 500W to 1500W a unit, so the project you pick for each salvaged transformer matters.
Now, if you know you only want to build one project ever, and you already decided what it is, and you'll only ever have one microwave to take apart, then you won't get to pick. You'll just have to make it work. But for everyone else who's not settled and has lots of ideas, you should know how a transformer works so you can make smart choices and have accurate expectations.
The main purpose of a transformer is to transform the voltage level and sometimes to raise the maximum amps available. Here's how it works. You have a voltage level that comes out of the socket in your home. For North America it is 120 volts, and in Europe and other places, it's 240. The problem is that that is usually too high, and sometimes too low of voltage to be useful for many applications, so that's why we use transformers to step the voltage up or down.
The parts of the transformer that work this magic, you've already seen. You need 2 or more coils, which create and absorb magnetic fields, and then you need a core that helps contain and direct the magnetic fields from one coil to the other. And that's it, that's a transformer. When you input AC voltage to only one coil, called the primary coil, even though the other coil, called a secondary, isn't connected to the primary by any wires or other electrical means, you get an AC voltage out of it. The only connections between the coils are the invisible magnetic fields.
So, we have the wrong voltage from the socket and we use a transformer gets us the right voltage to power a project. Then it's just a matter of scale. Should you use a big core to make a big transformer, or a little core to make a little one?
Power, measured in watts, is the product of the voltage level and the amount of amps that are flowing. A transformer can provide the same amount of wattage to the secondary as it can consume from the primary, even though the mixture of volts and amps is different on each coil. This means if you want a higher voltage, you won't be able to draw as many amps from it. Or, if you only need a lower voltage, your maximum amps will increase. A transformer is limited, by its size, in the maximum amount of power it can handle. That's how you know how big a transformer core should be. The more wattage you need to transform, the bigger the transformer has to be. To estimate the short term power handling ability of an MOT, just weight it. It's about 100 watts per pound.
Your project plans will tell you what voltage and amps it needs, and those'll be different for every project. In many cases, you'll want to match the voltage in the plans, but then just have as many amps available as possible. The more amps available, the more powerful the device can be.
If you have a selection of cores, use the smallest MOT that works for your application, so you can save the bigger ones for bigger projects that need more power. All of this will make more sense when you start looking into specific projects where these details are given. That's really all you need to know about what core to use.
2. Turns Count
Our goal in redesigning the transformer, is to set the voltage level on the secondary (which is our output), so that it's useful for whatever device it's powering. Now with transformers, we can't set the absolute voltage, we can only set the voltage proportions between the coils. But the method is very simple. The voltage ratio between the two coils, will be the same as the turns ratio between the two coils. So if you wrap twice as many turns on the secondary, it will have double the voltage of the primary. If you wrap half as many, it'll have half the voltage. And so on. To select the voltage we want, we need to wrap the correct number of turns on the new secondary. To calculate how many that should be, we need the 3 other pieces of info, but we already know them: the input voltage (always 120), the output voltage (given by the project specs), and the number of turns on the primary, which we're usually re-using. Then we'll know how many loops the secondary needs.
So, how many turns did that primary have?
Well, there's three ways to figure that out. One way is to unwind the primary and count the turns or figure it out by counting rows and columns, but that might be tricky. That's the stupid way, don't do that. The second way is to not figure it out, and not even do any math. Here's a shortcut. Most MOT primaries have close to 120 turns. Which, since there's 120 volts coming out of your wall, is by coincidence, one turn per volt. Now that doesn't hold true with other types of transformers or other sizes, but it happens to be generally true for MOTs. So if accuracy isn't too important for your project, or you hate math, you could wrap simply as many turns as the voltage number you want. If you want 12 volts, put 12 turns, if you want 24, then 24. If you want 2000 volts, then wrap 2000 turns. That's the lazy way.
You can't always be lazy, so the third way requires some scrap insulated wire and a cheap multimeter. They're 10 or 15 bucks at any hardware or electronics store. Take the wire and wrap a quick 10-turn test coil, power up the primary and actually measure the AC voltage. Since you know the secondary turns and voltage, and the primary voltage, you can calculate the number of turns on the primary rather than guessing. Then you can insert that missing piece to figure out how many turns to get your desired voltage. That's the precise way. If you don't have a multimeter, don't worry. You'd probably end up calculating that you were accurate enough being lazy.
As a quick note, don't think that you're better off to just trim turns from the primary, so that you won't need as many turns on the secondary. For reasons we won't get into, that would have disastrous consequences. In brief, for transformers to work without melting down, there is a bottom limit on turns per volt. MOTs are cheaply and poorly made and already skirting that bottom limit. In fact, as we'll cover later, they're often improved by adding extra turns to the primary. For our purposes, never have less than 1 turn per volt on the primary. Just leave them alone, or add more.
3. Wire Sizing
Now that you know how many turns to wrap, the second thing you have to do is select the right wire size. Generally, for high power projects, you're trying to get as much wire as you can into the empty space in the core. Otherwise you might as well have used a smaller transformer core. But you have two constraints. One is that you get the correct number of turns, no more and no less, or you'll get the wrong voltage. The other constraint is that the core only has so much space. You want to use heavy enough wire that when you wrap the correct number of turns, it all fits, but with little room to spare so you get the most out of your transformer.
That makes it a simple 2d geometry problem.
Looking through the cross section, some of the core space is taken up by the primary and the rest is available. Measure the length and the width of the available space. That's a rectangle, so length times width equals area. Write that down.
Now, when you're wrapping wire, you won't be perfect. There's going to be some air, and the wire won't fit perfectly into the available space, so, aim low. If you were a machine in a factory, you might get as good as about 80%. But since you're human, and you're watching a tutorial, 50-60% would be a good target. And I'm not dumbing you down, that's the best I can do too. Better to have extra space, which will also help with cooling, than not enough space and having to start over with different wire.
So, take your rectangle area, and get rid of the 40 to 50% of it you won't be able to fill, and write down the new area estimate. Then divide that number by the number of turns we figured out that your secondary should have inside that area, and write that result down. That number, is the max cross-sectional area of the wire (including insulation) that you have room for. But that's not too useful yet, what's useful is knowing simply how thick that wire could be. So, divide the per-wire area by 3.14, take the square root of it, and then double the result. Done. Don't be scared, it's just math, your calculator does it all for you.
By now you might have noticed something obvious. The more turns you need to fit into an area, the thinner the wire has to be to have room for them all. This is relevant, because if you remember from earlier, the more turns you have the more volts you'll get, and since you know transformer has power limitations, the more volts you get, the fewer amps you can draw. The purpose of wire is to carry the amps, and the thicker the wire, the more amps it can carry. So everything works out perfectly. When you need a high voltage, you'll need a large amount turns, which means you'll need thin wire to fit the turns in, but that's okay because with a high voltage you'll only be able to draw a low amount of amps, which is all the thin wire could carry anyway without overheating. And the reverse is true on the other end. Lower voltage, fewer turns, thicker wire, more amps available, and thick enough wire to carry all those amps. It's always self-scaling.
Brain full yet? Remember that cheatsheet I promised? Pause the video, copy this down. I'll explain the rest later.
Your transformer design is now done, and you should have 3 things: 1 - The size of core that fits your project, 2 - The number of turns on your secondary, and 3 - The overall wire size, including insulation.
If you have those, great. Except that I lied to you. The numbers you have are probably wrong and will need adjusting later. Good, good practice through. Moving on!
Now go watch Part 3, the exciting conclusion, where I teach you how to build the coils and mount everything back together hopefully without burning your house down.
Bonus/Advanced Content:
If one MOT isn't big enough for you, why not more? I've seen projects with as many as 16. You can only get 1800 watts out of a normal household circuit, which means about 2 MOTs are the most you can hook up without a special setup. You can hook them up with the secondaries in series or parallel, but just note that now the polarity and phase will matter, so if you end up getting nearly zero volts it means the transformers have opposite phases. To fix it, just swap the output terminals on one of the transformers.
Even more efficient than using two separate transformers, is if you can get a pair of identical cores. They only have to be identical when looking at the E, the depth, or "core stack" direction isn't as critical. Then you can stack them together E-to-E and end up with a supersized transformer. You'll want to wire the two primaries in parallel and wrap a single, big secondary. Or, if you wanted to run your transformer from a 240v socket like an oven or clothes drier uses, wire your primaries head to tail in series so the new primary has 240 turns.
MOT Salvage Part 3 - Script
Welcome to Part 3 of my tutorial series on MOT salvaging, where I show you how to turn broken microwaves into cool projects. If you've just come across this video, obviously it's part 3 so go watch parts one and two first or you'll be lost. They explain how to tear down a microwave and its transformer the easy way, and how to get the numbers you'll need before you start making a new coil and putting it back together.
In this video, we cover some prep work, coil winding, and the final reassembly.
1. Prep Work/Repairs
Take out your core and the primary, and inspect it. If you have a few laminations that splintered off, and the damage is mild, just glue it and clamp it back together. Else, just rip them off. If you have leftover varnish on the inside of the core walls, you can chisel or file or sand it smooth. It's not necessary, but it'll help your coils slide on later, especially if they're tight.
Next, inspect your primary for damages you may have inflicted on it in a moment of frustration while trying to extract it. If there are scratches or gouges, try to isolate them from the other wires, and then paint them with fingernail polish or glue or something so they don't short. Lay the windings back down and glue a snippet of paper over that edge or hide your failures with a piece of tape.
Next, if it matters, you should be able to tell by the weight if your primary is aluminum or copper. Most are copper. Aluminum will seem very light in comparison. Both can be any color on the outside, so if you want to be sure, cut one of the terminals off and see if the wire is copper or aluminum colored through the inside. Aluminum is 40% less conductive, so it will carry only 60% of the max amperage of copper the same size. This may matter for your project. Sometimes aluminum primary wire is oversized to compensate, but not always. And unless you feel like wrapping a whole new primary or finding another microwave, there's nothing you can do about it. Your new secondary does not have to match the material of the primary, you can wrap whatever you want regardless. Just lower your expectations if you find, and decide to use aluminum.
Then, consider your application. MOTs are built cheap and inefficient. They waste 20% of their power, and if you're keeping the magnetic shunts out, they'll waste a whole lot more and even need a fan running constantly to cool them unless you make some upgrades. This only matters if your project is limited by transformer heat or duty cycle, which many high power devices will be, or if your home circuit is being maxed out, which it might be, or, if the MOT will be in continuous use and a couple hundred extra watts all day would notably impact your power bill.
If you do want to do something about it, no other tutorials mention this, and it's not necessary, but you can cut that waste heat by 85% if you simply add extra turns to the primary. Up to 30 extra turns more will yield noticeable improvements, but even 10-15 extra can eliminate the majority of that loss. But note that doing so has the following chain reaction of side effects. 1 - It changes the # of turns on the primary, so it will lower the voltage on the secondary unless you compensate by adding more turns there as well. 2 - A bigger primary usually means less room for the secondary. 3 - Because the secondary now needs more turns, and has less space to put them in, your wire size has to shrink. 4 - Those thinner wires can't carry as many amps without overheating, which what we were upgrading to avoid.
The tradeoff is generally beneficial, so I suggest you add extra turns if you have the ability. Otherwise, this is one of those situations where you might want to put the shunts back in between the coils. They kind of compensate for it in a different, and inferior way.
The primary's wire will generally be 14 or 16 gauge, and if you're careful, you can just cannibalize another MOT primaries for wire, and solder it together. If you have another MOT project where you're not re-using the primary, that would be a good candidate.
To add extra turns you'll need to find the terminal that's connected to the outside winding on the coil, join the new wire to old one, and continue wrapping in same direction. You can cut that terminal off and twist the wires together, but it's easier to just solder your new wire onto the old terminal.
To do so, you need a source of heat like a soldering iron, gun, or a lighter and some solder.
Even though the wire looks bare, it's not, it's covered in enamel insulation. You need to sand or scrape off the last inch for the wire to conduct. I find it's easiest to add some solder to the terminal and wire separately first, so you only need to re-heat it later.
When the wires are joined, continuing coiling in the same direction. If you have extra space between the coil and core, you can fill that first before coiling a new row or two. More on how to coil, coming up soon.
When you're done, cut your wire and cover the old terminal with tape, glue or silicone. The new wire end replaces the old terminal.
2. Coil Winding
Speaking of wires.
You have 3 options for wires. You can use enameled wire. You can use normal hookup wire that you purchase by length at the big home stores. Or you can use bare wire and insulate it yourself.
The best option, and the only option for smaller or high voltage wires, is enameled wire because the insulation only adds 5% to its size. But, most of you will have to buy it and the heavier stuff you can only find in electric motor repair shops. Even if you can salvage it, using recycled wire is risky especially for high voltage because cracks and scrapes in the enamel are hard to spot and will allow electricity to arc and short the windings. If you're going this route and you do find any scratches, touch them up with fingernail polish.
The next best, especially for thick wire, is to buy or salvage bare wire, or strip some junk wire, and then cover it with either heat shrink tubing or teflon tape. This is actually cheaper than buying insulated wire and better. You'll want to buy your heat shrink on a roll, not the cut up 6" pieces, and it only costs about 20 cents a foot from your favorite auction website. Put the heatshrink on BEFORE you coil it. Heat shrink is good for 125'c, and its much thinner than the insulation on hookup wire. Heatshrink might only double the bulk of your wire. Teflon tape is in the plumbing isle. Half inch wide is the most common, but buy the widest you can find. It'll mean a lot less wrapping and fewer bending issues. When you teflon wrap, overlap at least half of the previous turn, both for thickness and so gaps won't appear when you bend it around a corner.
As a last, but sadly most common resort, you can use hookup wire. The insulation is so thick you can reuse old wire from commercial renovations or wherever, without much worry. Just make sure you measure on top of the insulation when sizing and don't just read what it says for the copper size, or your wire won't fit. But here's why it's troublesome.
These are two coils I'm rather proud of. They're tightly wrapped and they fill the core just about completely. But if you do the math, even though my fill rate is about 65%, if you only consider the useful copper conductor, it's not even 20% filled. That's turning for example a 1000 watt transformer into one that can only support 200 watts on a continual basis without overheating even when fan cooled. The insulation more than triples the area of the wire. That means a bunch of bad things: 1 - I'm wasting most of the size of this transformer. 2 - My copper conductors aren't nearly as thick as they could be and they'll overheat much quicker. 3 - The low-temp insulation tends to melt, and 4 - The insulation is so thick it prevents the copper from cooling.
But, just know the limitations and use what's available. For intermittent use projects that need high power pulses with long breaks between, like some welders, hookup wire can be okay. But it wouldn't be appropriate for a battery charger or inside a stereo, something that stays on for a long period of time.
When wire sourcing, pick whatever has the thinnest and highest temp insulation, all else equal. For low voltage purposes, insulation only needs to prevent copper from touching, so any wire that's not outright bare has plenty. Remember you have a max total wire size including insulation, but for us anything thicker than paint is useless, you want as much of it to be copper as possible.
To estimate how much wire you need, make one big loop out of string or scrap wire, measure its length, multiply it by the number of loops, and then add a couple feet for hookup. That's estimating high, but you don't want to end up short. If you're too lazy to estimate, it's about one foot per loop, but, don't complain to me if you run short.
If you have trouble getting thick enough wire but have lots of wire 2/3 as thick, just wrap two identical thinner coils and connect them in parallel. It's analogous to needing a 2x4 but using pair of 1x4s glued to each other. As long as the coils have the correct turns count each, you can stack up as many as you can fit.
Bobbins/Spools
Once you've got your wire, you're ready to wind it.
Now if you didn't separate the E and I pieces, you're going to have to thread your wire all the way through, back and forth each time, and you're going to struggle to get it all in square and laying flat. When it starts getting tight, you can use a screwdriver to help squeeze the last few turns in. It's not so bad for the very low voltage projects, but for higher voltage ones it's practically impossible.
For example, if you had even just a 60 volt secondary, you'd be pulling 60 feet through, then 59.5 feet back, just to get 1 turn in. Then 59 feet, and 58.5 to get the 2nd turn. By the time you're done, you'll have threaded 1800 feet of wire. Higher voltages are even worse. For example, your original 2000 volt secondary would've had you pulling a million feet of wire. And even if you could do it, the wire would have snapped from being work hardened, and the insulation would have been scraped away to nothing. It's not so bad for small voltages, but trust me, just spend the ten bucks on a hacksaw and do it the easy way.
Everyone with their core disassembled will want to make a spool, or bobbin to coil the wire on before transferring the coil to the transformer.
To make a bobbin, first measure the center column of the core. Add a couple millimeters to the internal measurement so that your coil doesn't end up too tight, and add at least a pencil's worth to each side of the external measurement, if not more like a half inch. The extra space outside will prevent the corners from rounding and will double the cooling.
Then measure the height of available space, and cut this block out of some scrap wood like a 2x4. If you don't have any scrap wood, go to a place that sells lumber, and find their cut room. Ask if they'll give you some scrap.
Next you'll need sides. Cut them out of plywood and make them 1/4" oversized. If you don't have any scrap plywood, try the cutroom again, maybe sacrifice a dollarstore clipboard, for science. If you want to get fancy, cut a piece for a handle and buy: a couple long bolts, some lock washers, nuts, more scrap wood, and use them to create a winch. Like this.
Then you're ready to start wrapping.
Wrapping
The most important thing when wrapping, is to make sure your wires are tightly packed and straight through the core. Outside the core surrounded by air doesn't matter as much, but inside the core need to be perfect. If it's not, you won't fit your turns in.
Note that you want to attempt hexagonal packing, laying each new layer into the previous groove. Not square packing, where the gaps are slightly larger.
Before you start, put some thin cardboard strips or tape on the outside edges, to prevent the coil from shifting when you're done. If your project doesn't have an exact voltage and thereby turns target, mark on your bobbin, where the edge of the core will be so you know where you'll have to stop.
Add a notch or screw and wrap the wire on it to anchor it, and begin wrapping from the outside. For thicker wire, counter-intuitively, make sure you kink each wire at the corner outward with your thumb before it passes through the core again, so that it lays flat. You can pull as hard as you want like this, but it unless you kink it, it will always bulge in the middle.
Make sure all your core passes are horizontal, not angled, or you'll lose a row every layer and the wire will bunch up. Instead, make all your angle changes on the outside right where you started.
When you're done, slap a big piece of duct tape on the coil so it doesn't shift on you, then tape down the cardboard strips. Unscrew and slide off one side of the bobbin, holding the coil with your hands in case it tries to spring.
Hold the coil on the edges with your fingers, and push the rest of the bobbin out. Now would be a good time to ziptie the coil or add extra tape. You might even want to ask for help so you never have to let it go. If the coil shifts you won't get it back together tight and you'll be inventing new curse words starting over.
Be careful when test-fitting the new secondary, insulation rips and cuts very easily on the corners of the core. If you've done everything correctly, the coil should fit onto the core. If not, either your math was wrong, or your measurements were wrong, or you lacked basic motor skills. Either way, you have to choose whether to accept the lower voltage of howevermany loops did fit, or, start over. But before starting over, here's a couple things to try. First, if you can see that the problem is that the coil is too rounded, try crushing the coil slightly with a wood-lined vice or mallet a little at a time, and see if you can get it to fit better. Second, if you have to take off a layer of windings, try clamping the core back together and threading as many extra as you can through whatever gaps you can find.
3. Reassembly
If everything fits, you're ready to reassemble. If you have room, glue some cardstock like this to the inside of the core to help insulate. If you're using enameled wire, always do this.
It doesn't matter which way you put the coils on, but most of the time I like to have the terminals of the secondary on the opposite side of the primary. Generally my power plug goes out back, and whatever the project does happens up front, but another reason I do it that way is that I like keeping the terminals away from each other so they can't short.
To reassemble the core, the E and I pieces have to be touching. They don't require an electrical connection, since a transformer is a magnetic device, but they do need to fit back together with no air gap. The best way to lock the core back together, if you have a welder, is to tack weld the 4 corners. Don't try to reweld the whole seam, it doesn't help and will cause problems with eddy currents. If you don't have a welder, and I'm guessing most of you won't, just use some silicone, GOOP, zipties, or hose clamps. As long as its touching it doesn't matter. The only problem if you don't get it solid enough, is noise. Remember this?
Even after you secure the core, the coils will also rattle, so it's a good idea secure them with wood or cardboard shims. If possible, at the same time as you're securing the coils with shims, try to leave room for airflow. Old transformers used to be submerged in beeswax when they were complete, to hold everything in place. Modern transformers are usually vacuum pressed or dipped in several coats of varnish. Securing all surfaces with silicone works well too. This not only cuts down on the noise, it will prevent the coils from scraping and shorting out.
And there you have it. Everything you need to know to turn a recycled microwave oven transformer into a high power transformer of your own design.
Bonus Autopsy
Before you junk the microwave, take everything else off it. Most of it will come in handy for future projects.
Power cord, fan, and switches are needed for almost every project. The cap, magnet, triac, optocoupler, relay, motor, feet, and even the sheet metal on the frame can come in handy for others.
Now that you know how to build your own transformer, you're ready to make all kinds of fun, high power projects.
First up in my next video is an easy and popular one, a spot welder!